Clinical Perspective: The veneer procedure is not a one-size-fits-all process. Every step is customized based on your specific anatomy, goals, and bite. The most critical factor patients overlook is bite evaluation — a dentist who does not discuss or address your bite status before placing veneers is cutting a corner that can compromise your long-term result.
The decision to transform your smile with porcelain veneers is a significant one, and most patient hesitation comes from a simple fear of the unknown. What exactly happens in the chair? How long will it take? Does it hurt? This guide walks you through every step of the clinical procedure, from the first conversation to the final placement of your veneers. The goal isn't just to give you a beautiful smile, but to give you one that is built on a solid foundation and will last 15–20 years with proper care.
Curious About What Veneers Might Cost?
Get a surprisingly accurate, personalized cost estimate in just a few clicks. Takes 60 seconds, no commitment required.
Get Your Personalized Estimate →Is the Veneer Procedure Right for You? The Initial Consultation
The journey begins with a comprehensive clinical consultation, which typically lasts between an hour and an hour and a half. This is far more than a quick look — it's a deep dive into your goals, your dental history, and the current state of your oral health. The consultation is designed to hear your story and understand what you hope to achieve. From there, the dentist conducts a thorough examination, which always includes a full set of records: photos, X-rays, and a detailed assessment of your bite, or what clinicians call occlusion.
The bite is the foundation of everything. A beautiful smile that doesn't function properly won't last. Based on this initial analysis, the dentist can usually determine the best path for you — whether that's a straightforward cosmetic case of 10 upper veneers, a more involved 10-over-10 case for a broader smile, or a full mouth reconstruction. Almost everyone is a candidate for a better smile; the purpose of the consultation is to determine your unique path to get there. Learn more about veneer candidacy.
Brandon — What the Procedure Actually Looks Like
Challenge: Brandon needed 24 restorations — a complex case that illustrates every stage of the veneer process.
Treatment: Full bite analysis, temporaries, bite records, final E.max veneers and crowns over multiple appointments.
Outcome: Brandon's case is the most detailed documentation of the veneer procedure on this site — including what went wrong with the first set of bite records.
Read Brandon's Full Procedure Account → View Full Case StudyThe Veneer Procedure Timeline: A Predictable System for Success
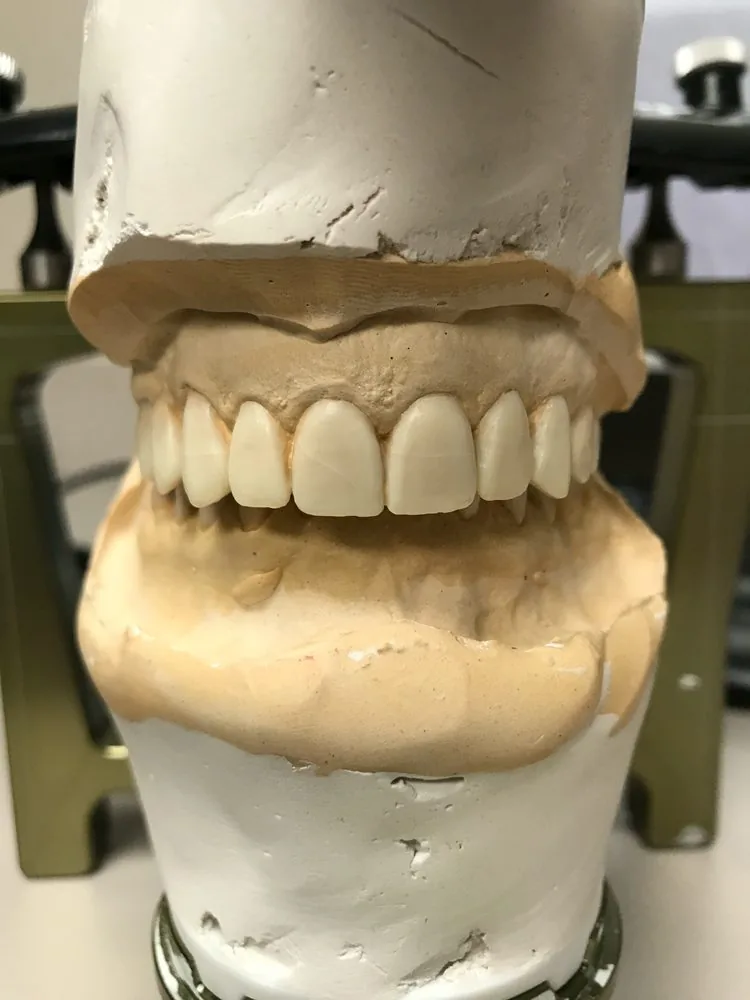
Step 1: Records, Photos, and Designing Your Smile
After the initial consultation, the process moves into the design phase. This always starts with a meticulous set of records — a comprehensive series of photographs and digital scans or impressions of your teeth. These aren't just snapshots; they are the essential blueprints that the dentist and a master dental lab technician use to design a smile that is in harmony with your facial features. This is a highly collaborative process. Shade, shape, and length are discussed, but most importantly, how the new smile will support your lips and cheeks and function with your bite.
Brandon — Full-Arch Bruxism Rehabilitation
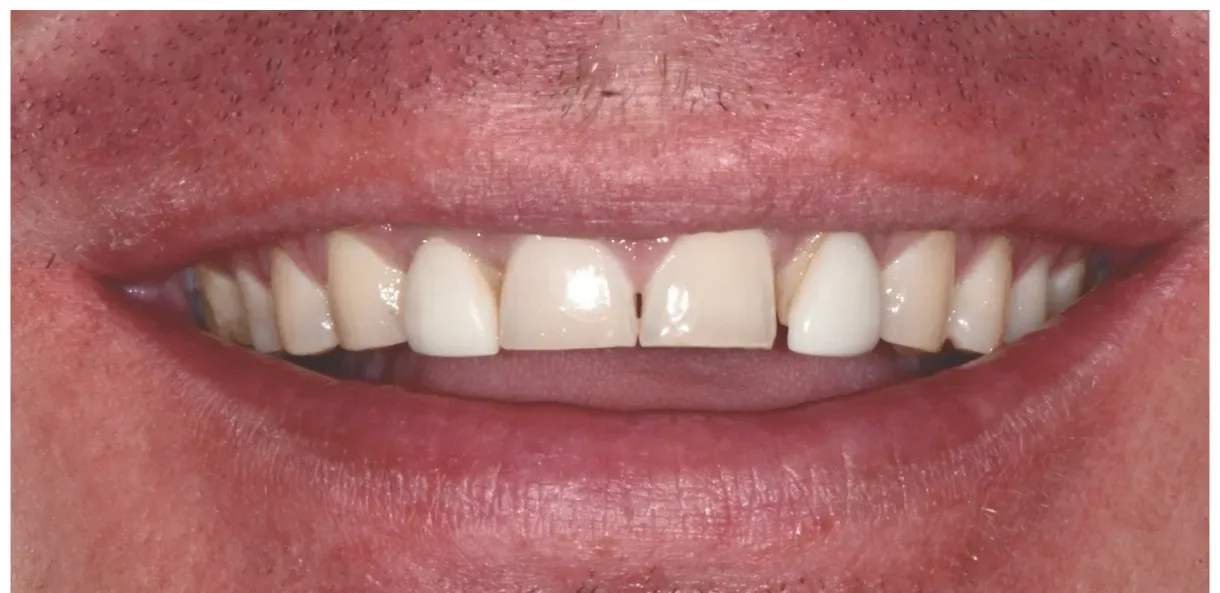 Before
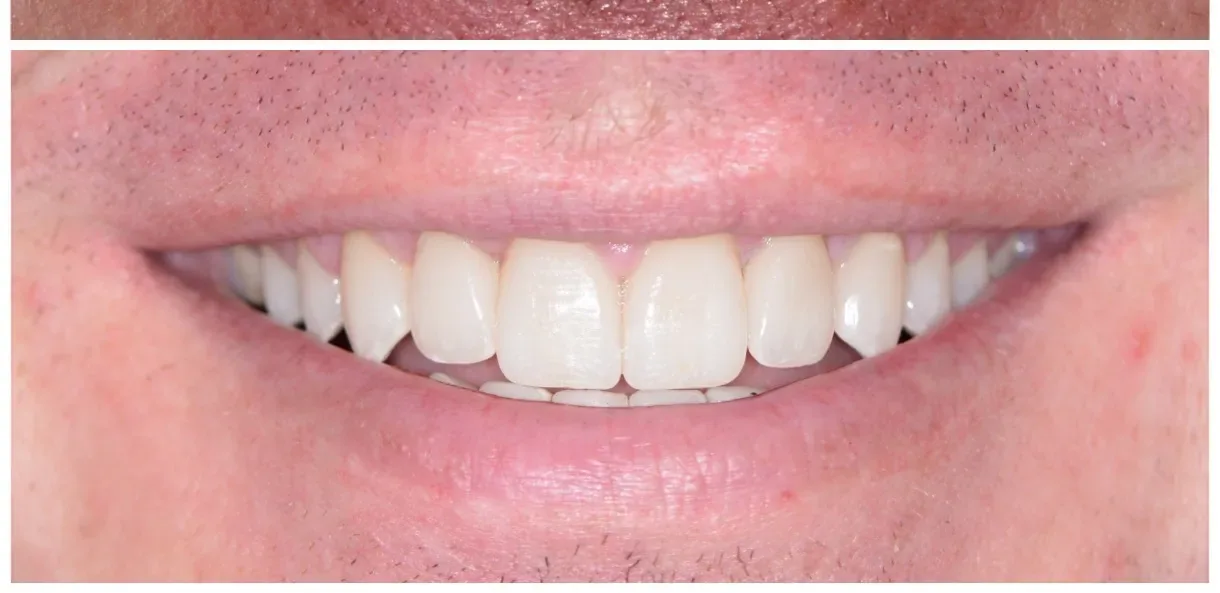 After
After
A complex 24-unit case that required 3 appointments and a full bite reconstruction.
Read the full case →
In cosmetic dentistry practice, the temporary veneer phase is often the most critical yet undervalued step. This phase allows for precise adjustments in shape, length, and contour that cannot be altered once final porcelain veneers are bonded. For example, if a patient experiences discomfort with the bite or dissatisfaction with tooth length during temporaries, modifications can be made easily—such as adjusting incisal edges or contact points. Once the final veneers are cemented, changes require invasive procedures or complete replacement, which increase time and cost. Therefore, patients should view the temporary phase as a vital opportunity to collaborate actively for optimal function and esthetics before finalization.
A quality cosmetic practice uses a "smile try-in" — a mock-up of the proposed changes — to give you a tangible preview. This is a critical step that many dentists skip, but it's non-negotiable for achieving a predictable, highly trained result. If a dentist isn't taking thorough records, it's a major red flag that they may not be working with a high-quality lab.
Step 2: The "Prep" Appointment & Why It's Crucial
To create a seamless, natural-looking result, a very thin layer of enamel must be removed from the front of the teeth — typically about 0.5 millimeters, the thickness of the veneer itself. This allows the final porcelain to sit flush with the gumline and not look bulky. The idea of removing enamel can sound intimidating, but it's a precise and conservative process. It's what allows for a truly transformative result, as seen in the case of Joanne, whose case involved significant changes to her bite and tooth position.
For younger patients, or those with very healthy teeth, a "composite-first" strategy is often suggested. Beautiful results can be achieved with composite veneers, which require less preparation, and then transitioned to porcelain later in life. This preserves tooth structure and gives them a fantastic smile for years.
Step 3: The Temp Phase — Where the Magic Happens
After the preparation appointment, a set of temporary veneers is placed. The temp phase is the most important part of the entire process. These are not just placeholders; they are a cosmetically beautiful, life-like prototype of your final smile. The temps are used to solve every single problem — dialing in the bite, perfecting the length and shape, and making sure you are 100% happy with the aesthetics. You will live in these temps for a couple of weeks, which gives you the chance to "test drive" your new smile in your daily life.
This collaborative design process is what makes the results so predictable. Any adjustments you want are made during the temp phase. Don't be nervous — every concern can be addressed in the temps. It might take an extra appointment or two to get the bite just right, but a few extra appointments for a lifetime result is always worth it. Learn more about temporary veneers.
Step 4: Master-Level Lab Fabrication
While you are test-driving your temporary smile, a master ceramist is meticulously crafting your final porcelain veneers. The impressions of your approved temporary veneers, along with detailed photos and notes, are sent to the lab. This is where the partnership between a clinician and a high-end dental lab becomes critical. A great lab technician is an artist — they use the approved temps as the blueprint to hand-craft each veneer, matching the exact color, translucency, and surface characterization to your natural teeth. This process typically takes two to three weeks, which is why the overall timeline from consultation to final placement is about three to four weeks.
Step 5: Final Placement & Bite Equilibration
This is the day the vision comes to life. At the final placement appointment, the temporary veneers are first removed and the final porcelain restorations are tried in. This is the last opportunity to inspect the color and fit before they are permanently bonded. Once final approval is given, the bonding process begins. The teeth are cleaned and prepared to create a strong, durable bond with the dental cement. Each veneer is then placed with precision, and a special light is used to cure the cement, locking it into place.
But the process doesn't end there. The final, critical step is bite equilibration. The patient bites down on marking paper and the dentist makes microscopic adjustments to ensure the bite is perfectly even and balanced. This is absolutely essential for the longevity of your veneers. The appointment finishes by taking a new set of impressions for a custom night guard — your insurance policy for protecting your new investment.
What to Expect After Your Veneers Are Placed
There is virtually no recovery time after the final bonding. Most patients go right back to their normal lives. It's common to have some mild sensitivity to hot or cold for a few days as your teeth adjust, but this fades quickly. Your gums might be a little tender, but that also resolves within a day or two. The most important part of aftercare is protecting your investment. That's why a custom-fit night guard is essential for every veneer patient. Wearing it every night is the number one factor in ensuring your veneers last for decades. Beyond that, simply care for them as you would your natural teeth: brush, floss, and see your dentist for regular check-ups. Learn more about how long veneers last.